Phantom of the Black Parade
|
Post by Kuroya on May 11, 2015 7:53:16 GMT -8
Yes, yes, I know, rather untraditional topic. However. There is merit to it.
As far as I know, tumblr has unlimited bandwidth. Not to mention their icon stashes are pretty big, and there's no limits to how many you can put up. However, on the other side of things, there's also no guarantee you'll be able to trace the icons back to you (as well as the fact that it's more than likely that unless they're posted privately, you'll likely end up with your icons on other blogs and no real way to regulate that). But given that it happens anyway, the really only way to "safeguard" against it is to post privately and/or watermark the icons.
However, I digress. I'm going to show you guys how to post up icons using Tumblr. This is under the current updates as of May 11, 2015 - the reason I put down the date is because a few months ago, it was ten times easier and I wouldn't even need to make a tutorial. Thanks Yahoo I'll include visuals of doing it with my own icon blog beneath spoiler tags for those who need help since the updates are confusing, but they can only help you so much. I'll also be writing this for people who have little to no experience in using Tumblr, so please don't be offended if I'm seeming really basic and hand-holding, I'm just trying to be thorough in my approach.
To start, you obviously need a blog to work with - any blog will work fine, even a personal, although I personally prefer to use an icon subblog since I take requests and all that fun jazz that comes along with hosting one. I also highly recommend making the icons beforehand, although you can edit and upload more. Sort of.
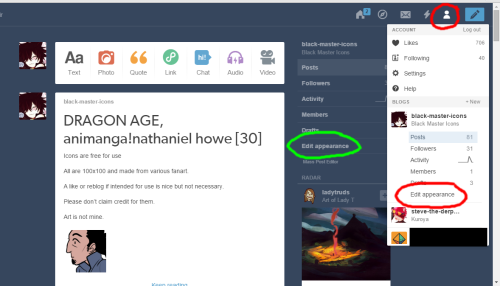
Once you've logged in and all that, you need to find the little person in the upper right hand corner (as circled in red in the visual). Click it to open up a dropdown. From there, you can either click on the actual blog (for example, steve-the-derpy-drag-kween in the visual) to pull up a page such as one in the visual, or you can straight out hit the "edit appearance" option (also circled in red). If you had taken the first option, edit appearance will also be on the sidebar (circled in green).
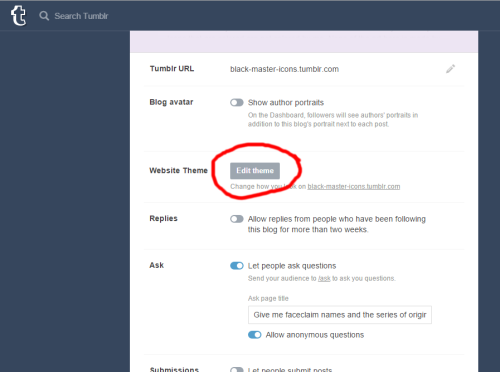
Regardless of which path you take, you will end up in the same place - in the blog settings. Once upon a time, you could edit your theme right out from that page; alas, it is now only a memory so instead you will have to scroll down until you find the Edit theme button (circled in red).
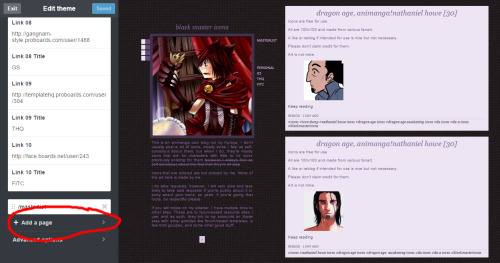
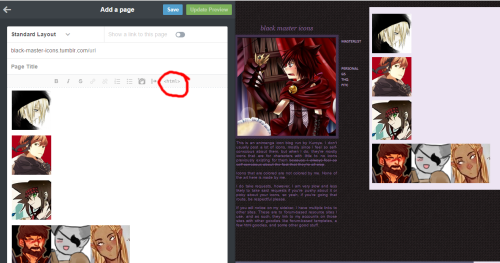
Hitting that will bring you to a familiar screen, the one you use when creating or editing a tumblr theme. On the black sidebar to the left, scroll all the way down until you meet a small area where there's an option to add a page (again circled in red). You want to hit this option since it's now the only one where you can mess with how images are displayed on "posts".
From there, you'll open up a page that may or may not be familiar. It is, however, strikingly similar to the old post page. Regardless, what you're going for now is the button that looks like a camera. This is the trusty old upload image button. I've heard that you can just drag and drop icons straight into the posting area, but in my experience this just crashes my browser, so I have to upload them individually. Whether or not you want to try it is up to you.
As depicted in the visual, if you just upload them, they appear one to a line, as shown by the first three icons. However, if you put your cursor next to them and hit either backspace or delete (depending on where you are), you can move them so that they're next to each other, as shown by the later three. The max width you're going to get on a line in the preview/edit area is five to a line; the max on a page will depend on your individual theme. At any time, if you want to see how they'll display on your blog, just hit the "update preview" button (next to the button circled in green on the top right of the black sidebar) and it will update the page of your blog to show what you have.
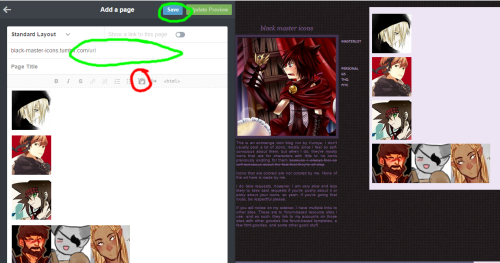
If you would like to save it as a page - which is useful if it's a faceclaim you use often or if you simply don't want to share the icons with people - you just need to edit something in under the url field (circled in green in the visual). You then just have to hit save (also circled in green) and you can access it via yourtumblrurlhere.tumblr.com/yourpageurlhere or by going back in the same way you did to make the page, only you hit the page rather than "make new page" (which would be if you had hit masterlist on the visual before the following one). You may also need to save the page a few times if tumblr is being a jerk and not letting you upload; a refresh tends to fix the issue, but it dumps you back out at the general edit theme, so be sure to save before you refresh, otherwise you're back to having none uploaded.
If you would like it as a post, however, continue with me to the next post because this is where things get messy.
|
|
Phantom of the Black Parade
|
Post by Kuroya on May 11, 2015 7:53:36 GMT -8
Now, to show you guys how to release the icons as posts. This will, depending on your tags and whatnot, put the icons out into the general community. Which means it would be accessible not just by who you give the link to but also by anyone who happens to search the tags you're using. For most people, this isn't a problem, but if you're not comfortable with that idea (or the thought of your icons being around and you not having credit), I do not recommend posting them as a text post. Some fandoms are nicer than others about dropping likes and reblogs on icon posts they use, but some aren't. As I mentioned earlier, there's no real way to track where your icons are going at all, so unless you're okay with that, I don't recommend posting them.
Disclaimer and warning aside, time to show you how to actually do this. And I'll do it using my normal format.
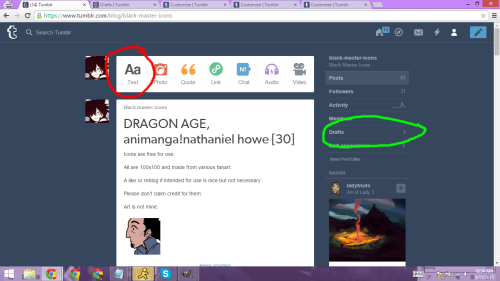
You want to go back to your dashboard or to the page of posts from the first visual - and it's important that you do this in a new tab since you will want your icons up on a different one. From there, you want to hit the text icon (circled in red) for a new text post. Be sure not to hit the photo option, it will not work out half as well for icons!
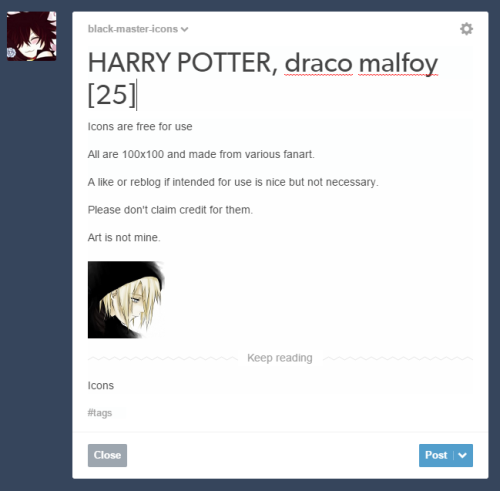
Once you hit the text icon, there's some stuff you can put down like a normal tumblr post. I myself like to put the series, faceclaim name, and number in the batch in the title, which is pretty standardized across the board as far as icons go.
Any other information, such as my little text blurb area, is optional; if you need ideas, you can look at a couple of friends of mine, Haru or Shay, both of whom also run icon blogs. You do want at least one visual there, however, to give an idea of the quality of icons.
If you are using a standardized template, much as I do, I highly recommend keeping it in your drafts area (circled in green). I also use drafts as a sort of to do list for requests, though the system doesn't always work out half as well as I think it will. I'll also show you how to make drafts in a minute, just be patient with me since we're again getting a lot of stuff between visuals.
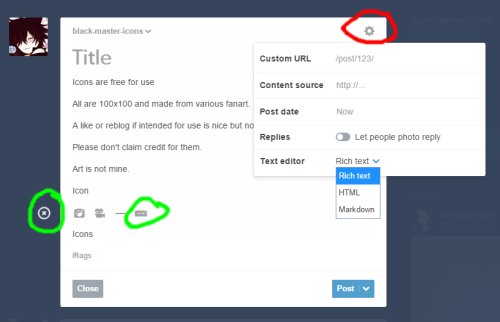
On the actual posting page, before you add anything, you do need to make sure that you are on rich text format. It makes things a lot easier in the long run. To make sure, you go up to the cog in the right hand corner of the post (circled in red) and hit the dropdown for text-editor so that you can use rich text.
If you are putting up more than five or ten icons, and particularly if they're not all right next to each other and not meant for you, it's highly recommended that you hide them all under a read more. It's considered polite so that too many people are not required to see all of your icons on their dash. To do so, you hit enter to make a new line and then hit the plus sign (where the green circled x is) and then hit the ... button (also circled in green).
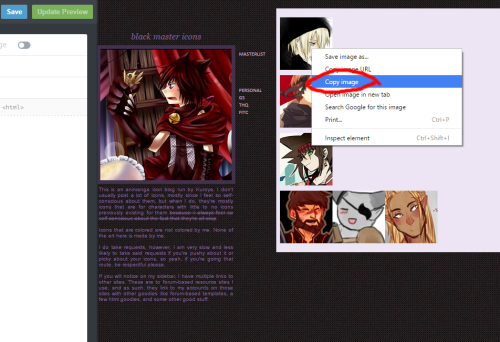
To add a visual icon preview above the read more, you're going to need to delete the text where you want the icon to be (the "icon") but not delete the line. Now you go back to your tab with the icons, right-click an icon, and hit "copy image". Flip back to your icon post, move the cursor back down to where you want the icon, and paste it right neatly into the space (the red circled cog will turn into a loading ... and just wait for it, it means it's reuploading the icon for you).
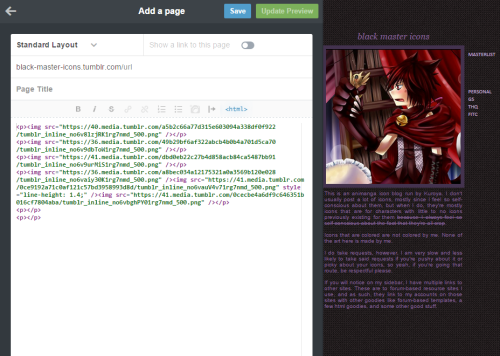
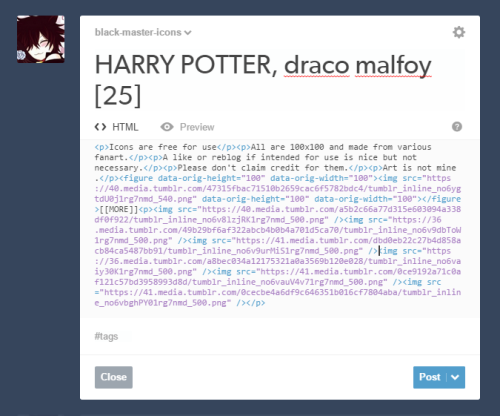
Looks nice doesn't it? To put the actual icons in, you're going to need to go back to that cog and change the text editor into html. Before we change that view, however, I'm gonna give you some visuals under the spoiler.
Now that you're in HTML view, remember that you cannot go back and change anything. It will cause terrible horrible mistakes. So yes. Make sure everything was right in the rich text format before you go messing with anything.
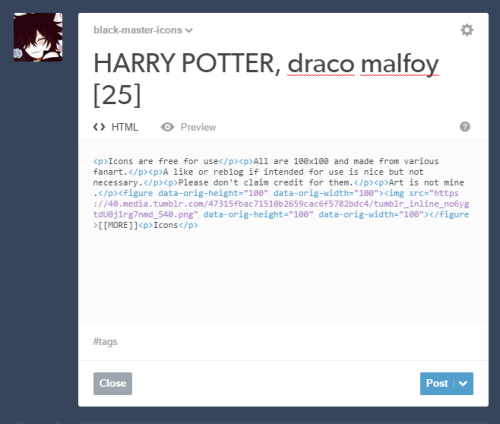
Tab back to your page of icons and hit the "<html>" button (circled in red). This will open up the actual html of the page... or, in other words, the urls and such for the icons. As a note, there will always be extra paragraph or <p> tags at the bottom of every page when everything is said and done. Ignore it. Doesn't matter. What you want is to highly the paragraph tags that contain the icons you want, including the <p> and </p> at the beginning and end. I also highly recommend temporarily placing them in a Notepad file so that you can remove any style="line-height:" type tags since they tend to show up, but that's just personal preference.
Once you have this html, you can tab back to your post tab. Right beneath your [[MORE]] tag (which is the html way of starting a read more), you want to replace the entire <p> and content with your icons. In the last visual of the following, this would be the <p>Icons</p> that you see.
This is another image-heavy spoiler, so I'm going to take a moment to catch you up to speed before I go on.
Once you do that, you should add in tags down at the bottom. Your post is just about ready and has any necessary information on it. Remember, however, that tumblr only tracks the first five tags of any post. Thus, tagging your icons with your url first really isn't useful for getting yourself out there. I recommend tagging the character's name, the series name, and then character's name icons and series name icons. Popular series name abbreviations + icons also happen to be good (such as "loz icons"), and for your own personal tracking purposes, you can add in your url tag and icons or icon dump at the very end.
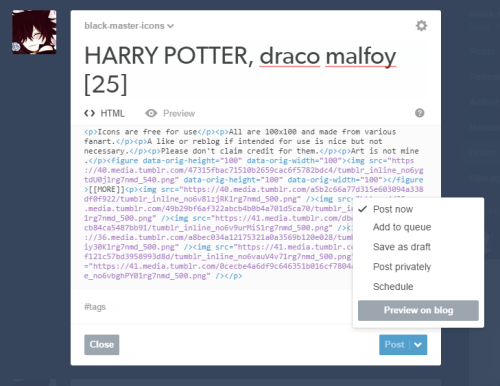
Regardless, once your tag area is complete, you now move onto the post area. I'm gonna show you a few of the options here if you open up the dropdown rather than posting right away, so bear with me. Interrupting spoiler is going to interrupt.
I'm gonna pause for a sec to explain all the buttons since it took me a year to figure out some even existed. A lot of them are really nice, so. And yes, this explanation is going to be out of order.
Post now should be default, and that is perfectly fine. However, you can also choose to add to queue or schedule if you want it to automatically post at a later date (highly unorthodox). Next up is post privately, which will make it so that the post is only visible when you open up that blog's posts on the dashboard. Highly unrecommended unless you insist on having your icons for you and only for you.
Save as draft option is one that will not serve you for icon-making; however, if you hit that and you have a template, it will save that template for you to be able to reaccess via the drafts on the dashboard. (You will need to save as rich text format, however, not html.)
Post now is the remaining option, so you hit that, and there you go, your icons are away! If you're running the blog to be both tumblr and forum-based, as I have been showing you how to, you should probably take the time to add the post into a master list page (either as a yoururlhere.tumblr.com/tagged/charrienamehere+icons or as a direct link to the post).
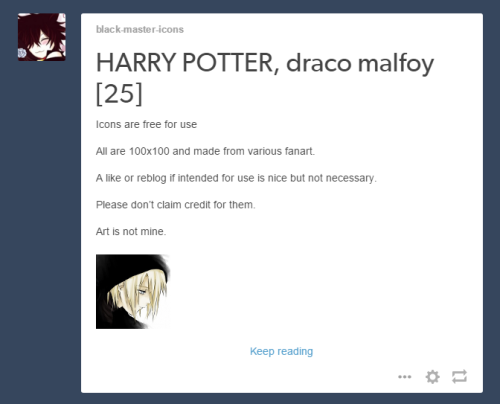
Regardless, this is the end of posting the icons, and as an end note, I'll show you what happened with how the icons came out from the testing! (And no, there's no tags, because I wasn't going to keep it up since it was merely an example.)
|
|
MOTHER OF THE MAGICAL GIRLS
|
Post by SIFR on May 11, 2015 11:02:22 GMT -8
I'll be reading this when I get back to my computer, but I do have some questions about the Icon Tumblr community for you when I get home. Idea struck me.
|
|
Phantom of the Black Parade
|
Post by Kuroya on May 11, 2015 12:20:58 GMT -8
I might not be able to answer them properly since I'm more casual than anything, but I'll do my best if you have any *nodnod*
|
|
A seadog looking for crewmates
|
Post by Elena on May 17, 2015 22:54:58 GMT -8
Thank you very much, it is really useful~! However, on the other side of things, there's also no guarantee you'll be able to trace the icons back to you (as well as the fact that it's more than likely that unless they're posted privately, you'll likely end up with your icons on other blogs and no real way to regulate that). But given that it happens anyway, the really only way to "safeguard" against it is to post privately and/or watermark the icons.
Why would I care if people reblog it? It is a sort of advertising for my tumblr, since it can be traced back to my tumblr as being the one they are reblogging from. |
|
Phantom of the Black Parade
|
Post by Kuroya on May 18, 2015 3:18:20 GMT -8
You're very welcome, it was intended as a good alternative for people to Imgur and Photobucket, but then I realized it's actually got a couple good guides for using Tumblr in it like how to make use of using your posting options so yeah.
And the reblogging isn't the problem. Reblogging is very traceable if you look at the activity, not to mention it shows up in the notes. The vast majority of icon blogs do request that you either like or reblog the icons if you intend to use.
No, the problem for tracking them comes from basically the same place as it does with people who upload the icons. There's no way to track who's using them without liking/reblogging or otherwise making note, and due to how tumblr uploads, there's no real way to hunt down the icon unless you happen to get really lucky and happen to see it. I personally get annoyed by it a little, not because I want credit but instead because I use the likes/reblogs to judge how much someone likes a particular icon set and if I have a lot of people using the icons from a specific character, that tells me I want to make another batch one day.
Reblogging is actually really good because it gets you far more traffic. Tl;dr: if you have an icon (or art or anything else) blog that you're following, like and reblog things you like and/or want to use, please and thank you.
|
|


 Five years ago, the Pokemon League formed Lux to create a new world order of peace and harmony. A rebellion formed, under the name of Nox, cries tyranny at Lux's new microcosmic control. Their civil war now tears the Pokemon world apart. The world hangs in the balance of predormitum. Which side will you choose?
 is a high stakes RP set in a dystopian Russian society recovering from an apocalyptic war between the armies of Heaven and Hell. Greater Russia now stands free from the influence of God and the Devil, and all non-humans run the risk of execution. Outside the safe zones lies the contained wasteland of Moscow, where demons and mutated shadowbeasts continue to terrorize the remaining human survivors who have been penned in with them. As of late, increasing evangelic disturbances threaten the peace that has ruthlessly maintained by the secret police.


